Categories

Showing posts with label Tips & Tricks. Show all posts

Nov 3, 2019

Tips & Tricks | Easy Removable Buttons

For cardigans, cowls and other handknits that require closure, buttons are an easy, go-to option. There's one significant problem, however. Eventually most handknits need to be cleaned, and many buttons are not designed to withstand washing, dry cleaning or other methods.

I can't speak for you, but there's no way I'm going to detach buttons, wash the item and then reattach the buttons. Life is truly too short for such fuss, so for many years, DIY removable buttons have been my preferred solution.

Luckily, removable buttons are not only easy to make, they open up a range of possibilities that make it easy to put buttons from stash to good use. The basic process is simple:
  1. At every location where you want a button, work paired buttonholes (i.e. work buttonholes at both ends of a cowl or on both button bands of a cardigan.
  2. Choose decorative button(s) that look good and suit your needs.
  3. Choose backer button(s) that fit through the buttonholes you've worked.
  4. Use coordinating thread to attach each decorative button to a backer button.
  5. Be sure to leave enough distance between the decorative and backer buttons to span the depth created by two layers of overlapped knit fabric.

My red Kintra cowl is a good example. After auditioning a range of looks and options, I decided in favor of a large, black button for the public side and a small, narrow white barrel for the backer button. The slim backer button fits through a single, unobtrusive button hole worked at both ends of the cowl.


Since backer buttons can be either purely functional or decorative for a reversible look, I decided to create another version. I chose two long, narrow shanked buttons and connected them using a standard jewelry jump ring, taking care to make sure the jump ring was smooth and wouldn't snag the yarn. 


Between the black, red and gold buttons, I've kept my options open and can change the look of this simple cowl to suit my mood and the occasion. I think the black button will get the most use, but we'll see how that unfolds over the course of the winter.


This isn't the first time I've used a removable/reversible button strategy. Many years ago, I made a loosely cabled cowl for a dear friend who had moved far away and was feeling bereft. The result was A Very Braidy cowl, which featured a pair of matching turquoise buttons backed by natural wood, so she could vary the look as she preferred.


As you can see, I tend to lean toward oblong buttons, but that's primarily a design choice. A few weeks ago, I shared my Wyndfael cowl with two types of removable closures, one an oversized but more sedate button and the other a whimsical pompom.


It's hard to argue with the practical benefits of removable buttons, but clearly they also allow you to have fun and experiment. Just be sure your backer button is both small enough to fit through the designated buttonhole and large enough to not pull out at the slightest pressure. If that happens, tighten up the buttonhole with a small tack stitch in each corner or swap the existing backer button for one that's slightly larger.


Aug 18, 2019

Not-So-Scrappy Scrap Blankets

As much as I love the look of a nicely executed scrap blanket, you might have noticed random is not a thing I do well. 

Unfortunately like most knitters, I have an abundance of scraps, leftovers and partials tucked in the stash. The challenge for me, therefore, has been to create a variety of ways to put these leftovers to good use. These afghan designs have helped me do just that, and they might help you do the same.


Angletyn

Worked on the bias, Angletyn's large-scale chevron design is highly adaptable. If you have lots of leftovers of similar weight, simply arrange the colors in a sequence you find visually pleasing, then knit each strip in a series of two-row stripes. If you have varied scrap amounts, try knitting stripes of different depths based on how much you have of each color. 


Color Check

Designed as a multi-color project, Color Check features a simple slip stitch that's ideally suited to burning through scraps and leftovers. Pick a unifying color for the check outlines and use scraps and leftovers for the fill colors. This reversible design consists of  strips joined to create two panels, which are then seamed together back to back. As a result, you can change colors as often as you choose without worrying about lots of ends to weave  simply bury them inside the seamed panels.


Drumlin

Worked with another easy slip stitch, Drumlin is a versatile, quick knit and is fully reversible. The stitch creates a fluted texture on both sides, and its attractive worked in a single solid color or in alternating two-row stripes. For a striped approach like the example shown above, try pairing two solid colors or match a solid with a complementary confetti, speckled or variegated yarn.


Herlacyn

From the beginning, Herlacyn was designed to help use up some of the many partial skeins lingering in the stash. In the example shown, colors were arranged in a diagonal pattern to create an ombre or gradient effect, but there are countless ways to adapt this pattern to accommodate yarn on hand. Try working the triangles in a single contrasting solid, rich or bright rainbow colors, or various shades from the same color family.


Lucben

Worked in strips rather than individual blocks, Lucben offers a fresh take on the timeless look of a classic 9-patch blanket. You can do what I did and mix various shades from the same color family to create a custom gradient, or choose a light and dark color, then alternate them for a checkerboard effect. Try a tonal approach using closely related hues for the blocks and borders, or try a simple two-color strategy, using one for the blocks and the other for the borders


Tikkyn

With its charming pindot stitch, Tikkyn offers a host of scrap-busting possibilities. Keep the emphasis on the cozy texture by working each strip in a different color. Tone down a busy variegated, speckled or confetti yarn by pairing it with a related solid shade. To accommodate different amounts of yarn, try working long stretches in one color combination and shorter sections in another, similar to Tikkyn Flagstone.


Twegen

Worked in yet another reversible slip stitch, Twegen is an attractive, easy way to put leftovers and partials to good use. For an interesting effect, choose a unifying main color and work each strip with that and a mix of colorful scraps and leftovers, both solid and variegated. For lighter weight yarns, try multistranding to create a fun marled fabric. For an ombre effect, sort yarns by color family and work each strip with the darkest shades at the bottom, medium ones in the middle, and lightest ones at the top.


Valere

With its compact geometric shapes, Valere readily lends itself to scrap-busting. Try a strategy similar to the one shown above, using a single color for the background and vivid contrasting colors for the banners or flags. If you have a lot of similar leftovers in a single color family, work all the banners in these varied shades. To use up small bits of yarn, work the banners in alternating two-row stripes. 


Keep in mind most of these ideas will work with a wide range of patterns. While you think about what type of scrap-busting project you prefer, take time to organize and inventory your scraps, leftovers and partials. That alone may be enough to prompt ideas and inspiration.

Some knitters, of course, are hyper-organized with yarny leftovers, but I'm not one of them. If I have lots of a specific type (I'm looking at you Cotton Fleece), I store all of them in the same small bin. With more limited leftovers, I tend to tuck them in with other yarns of the same or similar weight and fiber makeup, while super-small quantities often live out their last days snuggled with other small bits in a plastic container or ziploc bag.

Whatever you choose to do, I hope you found some of these tips useful. Each pattern highlighted here includes directions for three sizes (baby, lapghan, throw), along with detailed yardage breakouts, and easy modifications to help you transform all the yarn into something pretty and practical.

Happy not-so-scrappy knitting! 

Jan 20, 2019

Organizing the Stash: The Result

Last year was a watershed year on the knitting front, not for the number of projects completed or yards processed, but because I finally managed to wrangle the stash into some form of submission. 

Don't get me wrong. As I explained last week, the stash has been relatively functional for some time, but my long-term goal was to find a way to organize it more efficiently to make the most of space available.


After lots of measuring and weeks of research and comparison, I invested in a daunting collection of clear storage boxes from the Container Store in three sizes (women's shoe, men's shoe and sweater boxes). These boxes stack securely and make it possible to see at a glance what's in each container. The shoe boxes are just the right size for smaller quantities and finer yarns, while the large ones  aptly dubbed sweater boxes  hold heavier weight yarns and sweater (or afghan) quantities.

All that planning, measuring and agonizing paid off. Once the containers arrived, I emptied the old bins and began reorganizing the yarn. My strategy was simple: Whenever possible, I wanted same/similar yarns together, so I sorted first by weight, then by fiber, then by quantity and finally by color (weight > fiber mix > quantity > color).


The end result has been immensely satisfying. Sweater quantities occupy their own dedicated boxes. Stash staples like Cotton Fleece occupy multiple containers organized by color type (cool shades, warm shades and neutrals). 


Smaller quantities and mixed colors are stored like with like (shrine of precious, lace weight, workhorse worsteds, etc.), and in some cases, I've tucked in an oddball, singleton or variegated skein that works well with the yarn in question.


The entire stash now fits into two built-in, half-height cupboards that flank the fireplace. One holds all lace, fingering, sport and DK yarns, while the other holds worsted, aran and bulky. 


I've lived with this new system for awhile, and so far, I'm delighted. It's much more efficient and works beautifully. If I want a specific yarn or weight, I know precisely where it's stored, and I can access or restash it with a minimal amount of fuss.

As an added plus, consolidating the stash freed up several large drawers and smaller cupboards. One goal for this year is to reduce the number of knitting-related things that tend to sit out, so I hope to use this storage for WIPs, FOs, knitting tools, swatches, blocking mats and more. But first, of course, I'll need another plan ...


RELATED

Jan 13, 2019

Organizing the Stash: The Plan

January is traditionally the time when we vow to reduce clutter, get organized, and gain control over our lives and surroundings. For many knitters (including me), that means the yarn stash is a prime target.

The good news is that thanks to some diligent stashbusting, my yarn has for several years fit into its designated cupboards and drawers. The bad news is it's been plagued by a persistent problem: It's been stored in various plastic bins of different sizes and brands acquired over time.


As a result, a number of bins that fit just fine in the previous storage areas were now just a smidgen too deep, so they had to be placed sideways on cupboard shelves. After years of use, some bins and lids were beginning to crack with age, while the mismatched sizes meant stacking bins was a precarious business. 

In short, my stash was organized, contained and functional, but it was far from efficient. Retrieving or restashing yarn involved a frustrating juggling act, and the entire setup hogged far more space than necessary. Tools such as the yarn winder, swift, blocking wires and mats often sat out because there was no convenient place to store them.

I was determined to solve these problems, but first I needed a plan. I carefully measured (and remeasured) the primary built-in cupboards that flank the fireplace and smaller ones in the sideboard, where most of the yarn resided. I created only a rough inventory of yarns on hand, because it was evident more efficient storage would allow the same amount of yarn to fit into less space.


Then the hard part began. To find the right containers, I did lots of research, asked for advice from the ever-helpful Stash Knit Down group on Ravelry, and read tons of online reviews. A number of perfectly viable containers were eliminated from consideration because the dimensions were wrong for the spaces in question or the retailer didn't provide actual measurements.

Eventually, I narrowed my choice down to bins from The Container Store. They were clear, so I could readily see the yarn inside, and they came in a range of sizes. After more measuring and lots of calculations, I gravitated toward two options. 

Option 1 relied on a single bin size (men's shoe box) used consistently throughout.


Option 2, on the other hand, utilized three different sizes (a mix of women's and men's shoe boxes, plus sweater boxes) and offered significantly more flexibility. 


Once the details started to come together, I was eager to set things in motion. Ordering a boatload of containers in one fell swoop represented no small investment, however, so I decided to slow my roll, carefully consider the two possibilities, and think through the pros and cons of each. I also took the time to review my stash again, focusing on things like the number of sweater quantities and heavier weights yarns that lurked behind closed doors but which might require larger containers.

After much agonizing over options, alternatives and quantities, I pulled the trigger on Option 2. The outcome was even better than I initially envisioned (a rare thing indeed), so next week, I'll share the results.

RELATED


    Organizing the Stash: The Result 

Sep 16, 2018

Backstory

Two afghans are in the finishing stages. While I continue working on these tasks, it seemed like a good time to spend a moment talking about the backstory, or what things look like on the wrong side of my projects.

Lately, most projects have featured multiple colors, and numerous leftovers and partial skeins. This of course means there are always plenty of ends to weave. Now, it's a well-known fact finishing and end-weaving are not my greatest skill, and I've regularly confessed that with each project, I need to marshal all my patience and care to properly tackle this phase.


Most of the time, I choose to weave ends using a needle, because for me this gives the most polished and invisible results. Sometimes, I weave them as I go, but often, I simply wait until the end and handle them last, right before blocking.

Careful finishing is especially important, since I want scarves, shawls, afghans and home dec items to be tidy and attractive on both sides.


Because I'm slow, weaving ends takes a great deal of time and concentration. I've been experimenting, therefore, with other methods in an effort to reduce the number of ends and speed up the finishing process.

Herlacyn Heatwave is a good example. Each strip in this design produces 18 ends, for a total of 54 in the body, not counting seams and borders. Granted, there are many designs out there that produce far more, but facing that many ends in order to properly finish a project can be daunting.


To offset this, I've been trying to weave ends as I work. Above, you can see I'm picking up stitches for a seam, and at the same time, I'm weaving one of the yellow ends into the pickup (on the wrong side). 

I picked up the working yarn from behind the loose end, which traps the loose end between the working yarn and active stitch. The technique is quite simple, it just requires a bit of time and attention, and if you do it correctly, it's tidy on the back and invisible on the front.


Many knitters do this for just a few stitches which is easier, but I took a different approach. I left long tails, so the woven stitches would form a continuous (rather than interrupted) line along the edge of its matching triangle. This turns the necessity of weaving ends into a bit of a design feature, and on the wrong side, each triangle is bordered by wrapped stitches which imparts a look similar to applique.


Old habits die hard, so I'm still a bit sporadic and sometimes forget to integrate this basic step into my knitting. Other times, I simply choose to skip it, because in that instance, I prefer a more invisible approach. If your goal is to minimize the effort involved in finishing, however, weaving ends as you work is clearly the way to go.


Connecting with the linkups in the sidebar.

May 13, 2018

Swatch Stories: Full Circle

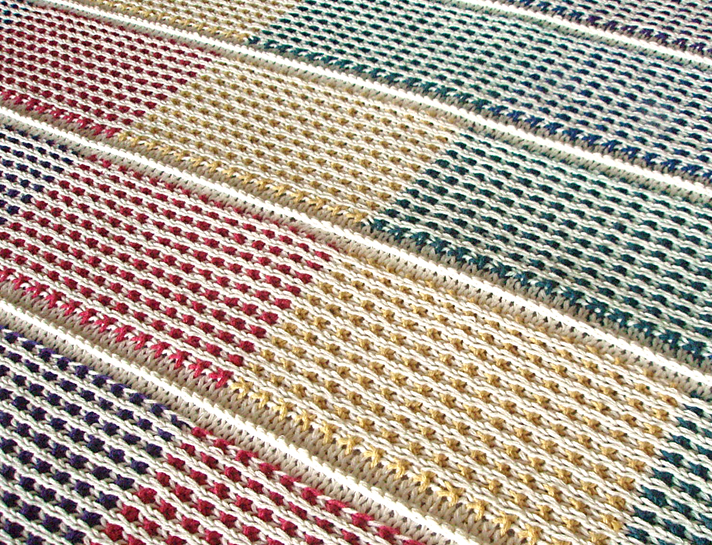
Many years ago, I fell in love with an easy textured slip stitch, which for reasons that escape my grasp, was dubbed the Pin Check stitch by the venerable Barbara Walker.
The stitch pattern creates two very different but attractive sides. On the front, a stockinette grid frames small purl bumps, while on the back, the pattern produces a lateral dot-dash or chain-like effect when worked in two colors.


I've swatched this stitch countless times in varied yarns and color combinations. The initial plan was to make a cozy sweater in neutral shades of black, grey and cream ...

 
or warm earthtones such as brown, taupe, tan and off white worked in a dark to light gradient.

Then I toyed with other possibilities, such as working shades of the same color to create an ombre effect against a black gridwork. 


Years passed, life happened and the sweater plans never solidified. 

Then one day, I realized this versatile stitch might be the perfect texture for an afghan. More swatching ensued, and eventually this stitch became the foundation for the Tikkyn Reversible Afghan, which I worked first in a fun rainbow scheme ...


then again in a combination of greys and burgundy.


Now, things have come full circle. While slip stitches are great for simple colorwork, they're texture stitches first and foremost. This rich purple yarn with its tantalizing touch of cashmere has for far too long been crying out to become a soft, cozy cardigan. It's possible this beloved little slip stitch with its plush, waffle-like texture might be the ideal way to make that happen.


Happy Mother's Day!


Connecting with the linkups in the sidebar.

Apr 8, 2018

Want Straight Edges? Try this Blocking Trick

Whew! The last end has been woven and my Herlacyn afghan is blocking as we speak. 

I promise to do a true FO post soon, but in the meantime, I thought you might be interested in a few quick tips and tricks to help you block everything from scarves and shawls to cardigans, blankets and afghans with greater precision and straighter lines. 

If you own the basic plain blocking tiles as I do, straight lines can be a challenge. If you're lucky enough to own blocking mats printed with a grid, you're ahead of the game but you might still find these tips helpful. Blocking wires provide a nice, straight edge, but they don't work for all projects.

Since I like to keep things as simple as possible, here's what I do. First, I connect as many blocking tiles as I need. Then, I tie a slip knot in a piece of string and hook it over one of the nubbins at the top edge of the mat.


I run this string down the full length of the mat and wrap it around the corresponding nubbin at the bottom, making sure it's taut and straight to form a guideline for the left edge.


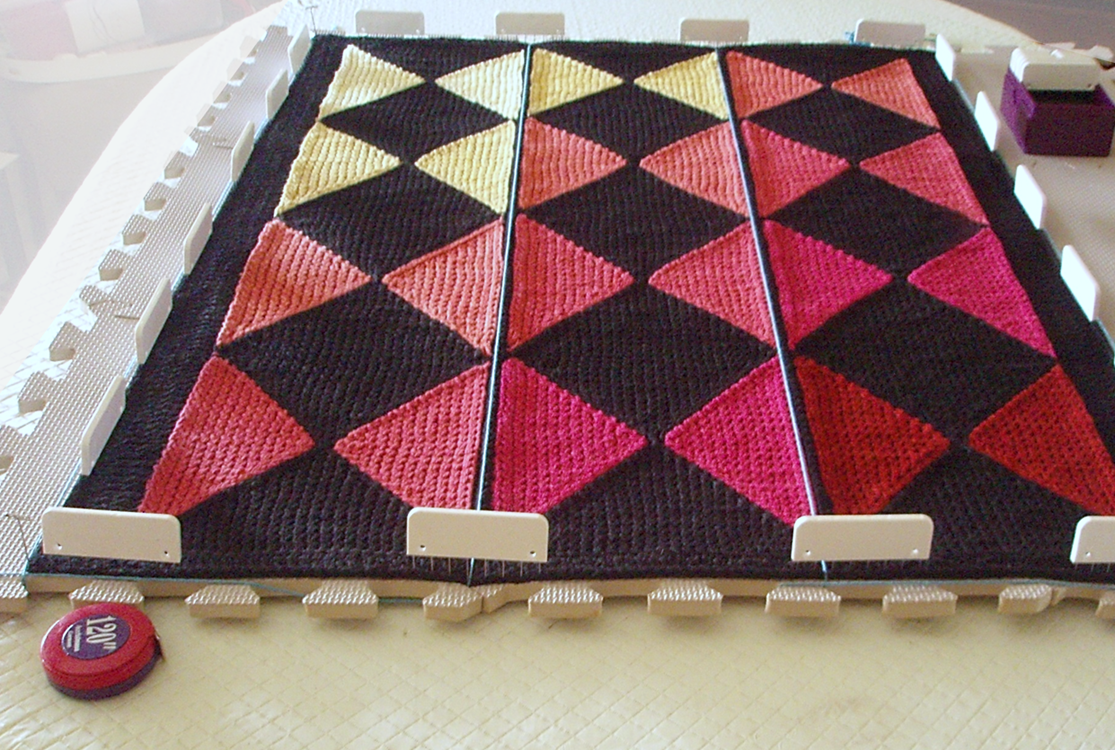
With the edge established, I begin spreading the entire piece over the blocking mats, continuing to run string lines between the top and bottom as needed. In this instance I ran four vertical lines (one for each edge and one for each seam).


I then start patting out the lumps and bumps, pinning things into place using the strings as a visual guide to align shapes, seams and edges. 


I keep my tape measure handy and continue to make adjustments until the end result looks something like this:


In this instance, I was able to use the top and bottom mat edges as a lateral guide, but if I need horizontal lines, I simply follow the same strategy and run strings side to side. It's equally easy to establish diagonal guidelines for triangular shawls or other items with slanted shapes, and if I were making a pile of individual blanket squares, I'd get the strings in place, block the first square, then leave the strings in place, so I could block each subsequent square to the exact same dimensions.

One of these days, I may invest in mats with a pre-printed grid, but for now, this fast and easy trick helps me block straighter seams and edges to improve the overall look of the finished piece. Have your own favorite blocking tips? Feel free to share them in the comments below.

RELATED


Connecting with the linkups in the sidebar.

Nov 12, 2017

Roundup | 10 Ways to Create DIY Ombres, Gradients & Fades

In knit-world, ombres, gradients and fades continue to be a big color story, which is why we've spent much of the past year exploring numerous ways to create your own. 

The reasoning is simple. Fads come and go, but gradients remain one of the most versatile strategies you can use to maximize a prepackaged kit, leverage a few skeins of newly acquired yarn, or transform stash skeins into something fresh and fabulous.


Whether they fade from light to dark or soft to bright, you can distinguish between ombres, gradients and fades based on the color strategy involved. Briefly, in my world:
Ombres feature a monochromatic approach using shades from a single color family.
Gradients typically incorporate multiple shades from two or more color families.
Fades may do either.
These guidelines are open to any interpretation that works for you, but in general, it takes at least two colors and three stages or shifts to achieve a gradient or ombre effect. Anything less, and you're essentially working some variation of stripes or color blocking. With this in mind, let's revisit 10 easy strategies for creating your own DIY gradient and ombre combinations.

(Click the titles below to see the original posts, each of which highlights five different strategies. Click a bullet item to see how-to directions for that technique.)


Ombres & Gradients: 5 Ways to Create Your Own

This post shares strategies for creating a:


Ombres & Gradients: 5 Fresh Ways to Create Your Own

This post shares strategies for working a:


As you can see, you can begin creating gradients with as few as two skeins, which makes these different approaches especially useful for stashbusting. By mixing and matching awkward orphans and singletons, it's both fun and easy to create combinations that are uniquely your own.

With more than 20 posts exploring different facets of ombres, gradients and fades, you'd think we would have exhausted this topic, but au contraire! From useful stitches and techniques to untapped color strategies, several new gradient posts are hovering on the horizon. 

Meanwhile, I hope these ideas will inspire you to experiment, because where ombres, gradients and fades are concerned the possibilities are truly endless.


RELATED


To see all ombre and gradient posts, click here.
Connecting with the linkups in the sidebar.