Categories

Mar 29, 2017

How to Create a 5-Stage Gradient (Option 2)

Five-stage gradients are next on our list in the ongoing saga of ombres and gradients.

Recently, we looked at one way to create a five-stage gradient. Today, let's dive in and explore an alternate approach. As you can see, unlike some of the other items featured in the ombre and gradient series, this example was quick, easy and compact.

5. Five-stage gradient (Option 2): Colsie Mitts Rose


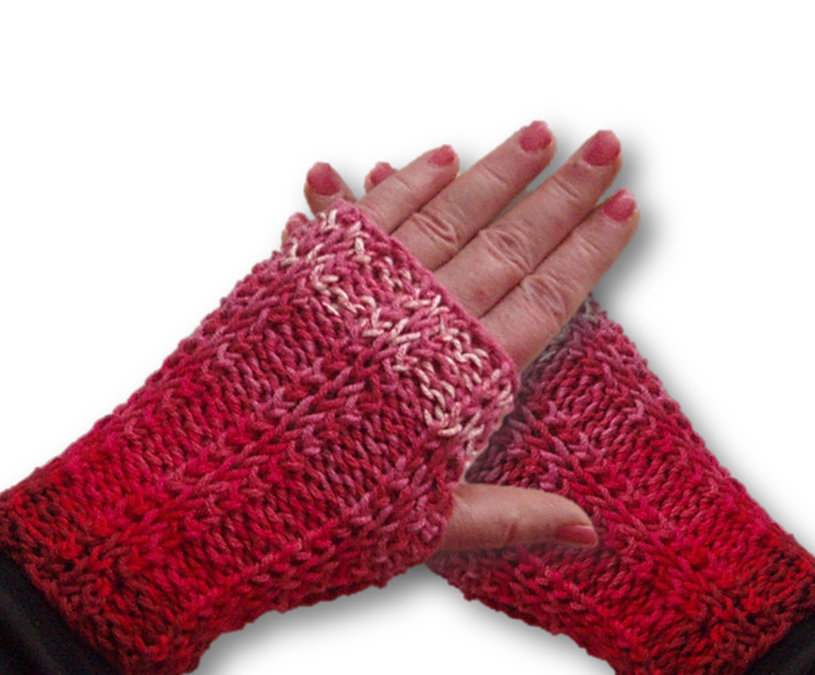
Yarns. Cotton Fleece (Brown Sheep), Four Seasons (Classic Elite, discontinued)

Stitch. This fast and easy slipped stitch creates a very stretchy, reversible 3x2 ribbed fabric, and the occasional slipped stitch helps blend the colors.


Strategy. Each section consists of two colors worked in alternating two-row stripes. To achieve a similar look:

  • Choose six related colors.
  • Pair them by value: dark with dark, medium with medium, light with light.
  • Work section 1 with two dark colors, CC1 and CC2.
  • Work section 2 with one dark and one medium color, CC2 and CC3.
  • Work section 3 with two medium colors, CC3 and CC4.
  • Work section 4 with one medium and one light color, CC4 and CC5.
  • Work section 5 with two light colors, CC5 and CC6.

In the example shown, the colors were worked as follows:
  • Section 1: Barn Red, Clear Red
  • Section 2: Clear Red, Cherry Moon
  • Section 3: Cherry Moon, Provincial Rose
  • Section 4: Provincial Rose, Medium Pink
  • Section 5: Medium Pink, Red-White Variegated

No matter what colors you choose, it's especially fun to work this gradient and see how different shades blend in each progressive section as your work grows.

I was highly motivated to tackle this example for selfish reasons. Once the mitts were finished, several small balls of leftover yarn were finally be gone, and I gained a fresh pair of mitts for spring. Win-win. (When I wrote this, there was snow on the ground, so yes, in this region mitts are an essential part of any sane person's spring wardrobe.)

I'm busily making samples for more upcoming ombre and gradient posts. Meanwhile, your comments are always welcome and if you have questions or need clarification, let me know and I'll do my best to clear up any confusion.

Connecting with the linkups in the sidebar.

Mar 26, 2017

How to Create a 5-Stage Gradient (Option 1)

Creating your own custom ombres and gradients is a fun and effective way to combine colors and use up leftovers and partial skeins, so it's one of my go-to solutions. 

One of my favorite approaches is the simple five-stage gradient, the fourth example highlighted in Ombres & Gradients: 5 Ways to Create Your Own. With just three colors, you can produce very different looks depending on whether you use high-contrast or closely related shades.


Let's take a quick look at the basics.


4. Five-stage gradient (option 1): Kintra Mitts


Yarn. Tajmahal (GGH, Lane Cervinia), Charlemont (Valley Yarns)

Stitch. The slip stitch produces a reversible fabric with stretchy, hand-hugging ribs.

Strategy. Solid areas are separated by transitional sections worked in alternating two-row stripes. To achieve a similar look:

  • Choose three compatible colors.
  • Arrange them from dark to light or light to dark.
  • Work the first section with the darkest shade only, CC1.
  • Work the second section with one dark and one medium, CC1 and CC2.
  • Work the third section with the medium shade, CC2.
  • Work the fourth section with one medium and one light, CC2 and CC3.
  • Work the fifth section with the lightest shade only, CC3.

The overall strategy couldn't be easier, but it produces very attractive results. For those who like specifics, the accent stripe was worked in Charlemont (Burgundy) and the mitt body was worked as follows:
  • Section 1: Black
  • Section 2: Black and grey
  • Section 3: Grey
  • Section 4: Grey and cream
  • Section 5: Cream

The Kintra Greyridge mitts below illustrate the same strategy, worked in closely related charcoal, pewter and silver shades for a tonal or ombre effect.


Five-stage gradients work with any color combination, so they're a highly effective stashbusting strategy and easy way to transform a simple pattern into a standout piece.

Try using fine yarns with a soft hand for a stunning scarf, cowl, shawl or stole. Or use assorted cotton or cotton-blend leftovers to create a rainbow of gradient dishcloths, towels, placemats or table runners.

However you choose to use this particular gradient strategy, I can guarantee you'll have fun. Just be forewarned, experimenting with different combinations can quickly become addictive.

To see the five-stage gradient (option 2), click here.
To see more ombre and gradient concepts, click here.

Connecting with the linkups in the sidebar.


Mar 22, 2017

How to Create a 4-Stage Gradient

Periodically, we've been talking about various strategies for creating your own gradients. We've already looked at simple, basic and three-color gradients, so it's time to tackle another one.

Today, let's delve into one way to craft a four-color gradient, so you can create one of your own. Our focus is example three from the overview post, Ombres & Gradients: 5 Ways to Create Your Own.


3. Four-stage gradient: Twegen Coffee


Yarn. Cotton Fleece (Brown Sheep)

Stitch. The fluted rib stitch produces a reversible, tweedy fabric with fluted columns on the front and fluted ribs on the back. 


Strategy. Each strip consists of two colors worked in alternating rows. To achieve a similar look:

  • Choose five shades in related color families. 
  • Pair them by value: dark with dark, medium with medium, and light with light.
  • Work the first strip with two darks, CC1 and CC2.
  • Work the second strip with one dark and one medium, CC2 and CC3.
  • Work the third strip with two mediums, CC3 and CC4.
  • Work the fourth strip with one medium and one light, CC4 and CC5.

In Twegen Coffee, the strips were worked as follows:
  • Strip 1: Cavern, Slate 
  • Strip 2: Slate, Teddy Bear Brown
  • Strip 3: Teddy Bear Brown, Milk Chocolate
  • Strip 4: Milk Chocolate, Cotton Ball

Arranged dark to light, the strips were seamed and trimmed with Cavern (black). Unfortunately, several of these colors are no longer available, but comparable ones are. Twegen Harvest features a similar strategy, using eight colors instead of five. In both instances, I chose this approach to make the most of yarn on hand and leverage the interesting woven look the fluted rib stitch produces.

The beauty of crafting your own ombres and gradients is the opportunity to tailor them to suit your tastes, make the most of yarn you have, use up oddballs and uglies, and more. I think this particular gradient would be striking in shades of burgundy, wine, claret, red and rose, in blues ranging from deep navy to summer sky, in greens ranging from forest to mint, or in subtle shades of grey.

Want to make a dent in your stash? From afghans to accessories, a four-color gradient is a great solution. It's the ideal way to combine a handful of colors to get the yardage you need for a larger project, or to use up leftovers and partials in smaller projects.


Connecting with the linkups in the sidebar.

Mar 19, 2017

Yarn is Dangerous

Knitting is fraught with fascinating conundrums. For instance, no matter how large your stash might be, there's a better than average chance the yarn you need (or want) isn't there.

Five skeins of grey? Lovely! Unfortunately, they're all the wrong shade, fiber or weight for the project you have in mind, so five fresh skeins join the ranks. (Added: 545 yards. Used: 366 yards.)

GREY DAZE SHAWL

Need some very special yarn for a gift? How thoughtful! Almost certainly, whatever you have on hand isn't quite right, so out of pure necessity you acquire several skeins of blue and teal to ensure you have enough yardage and some color choice. (Added: 1600 yards. Used: 400 yards.)

AUNT K'S SHAWL


Working on a project specifically designed to use up leftovers and partials? Great idea! Unfortunately, as you're heading into the final stretch, you realize the blues on hand are all wrong. So, you order two similar but different skeins of saturated turquoise, because surely one or the other will work right? (Added: 430 yards. Used: 40 yards.)


Want to get a jumpstart on this year's batch of Christmas ornaments? Sounds smart! Uh-oh. Every green yarn on hand is way too yellow (or blue or brown or boring), so you simply must get some in a more suitable shade. (Added: 550 yards. Used: 100 yards.)

CHRISTMAS TREES


Indulging in a spate of rainbow knits? What fun! However, thanks to your diligent stashbusting efforts, your supply of rainbow shades is depleted. To be on the safe side, you wisely decide to replenish your supply. (Added: 1505 yards. Used: 968 yards.)

TIKKYN RAINBOW


As you know, I knit from stash as often as possible, but invest in yarn without guilt when the need arises. What triggers those yarn buys? The examples above (gifts, specific design needs, desire for the perfect color) are good illustrations. 

These were logical, well-reasoned acquisitions, but that doesn't negate the fact that in this roundup, yardage in temporarily outweighs yardage out. That's okay, because with the help of some creative stashbusting projects, all of it will eventually find its destiny. Eventually.

That said, it's important to recognize reality. Let's face it, lush and lovely or plain and practical, yarn by its very nature is seductive and very, very sneaky. Apparently, like the herd animals that produce my favorite fibers, yarn is happiest when it's safely stabled in a cozy spot with an ever-growing flock of siblings and cousins for company.

That means alone and collectively, yarn strives to entice us with its soft hand, gentle halo, rich color, subtle sheen, and possibilities real and imagined. And that makes it very dangerous indeed.


Connecting with the linkups in the sidebar.

Mar 15, 2017

How to Create a 3-Stage Gradient

Light, soft and warm, Plumberry is one of my all-time favorite scarves. For years, this yarn languished in the stash, because it was so luscious I was terrified whatever I made wouldn't do it justice. I tested countless stitches and design ideas, and nothing seemed quite right.


After years of experimentation and false starts, I decided a basic three-stage gradient might be the solution and couldn't be more pleased with the result. The cashmere-silk blend is luscious, the colors suit my tastes, and as simple as it is, this scarf garners compliments every time I wear it.

The second example in the overview post, Ombres & Gradients: 5 Ways to Create Your Own, Plumberry features a strategy that's so straightforward, I almost skipped this post. But many knitters tell me they struggle with color and prefer step-by-step directions, so today we'll explore one way to create a custom three-color gradient.

2. Three-stage gradient: Plumberry Scarf


Yarn. Richesse et Soie (Knit One Crochet Too). Sadly, this yarn has been discontinued.

Stitch. The easy, fluted rib stitch produces a reversible fabric with fluted columns on the front and fluted ribs on the back.

Strategy. The cranberry and purple sections are worked solid, while the center plum section was created by working alternating two-row stripes. To achieve a similar look:

  • Choose two colors.
  • Work the first section with CC1 only.
  • Work the second section with CC1 and CC2.
  • Work the third section with CC2 only.
The strategy couldn't be easier, but with the right stitch, it produces very attractive results. For those who like specifics:
  • Section 1: Cranberry 9249
  • Section 2: Cranberry 9249, Purple 9713
  • Section 3: Purple 9713
The finished scarf is 4 inches wide and 60 inches long, so it offers lots of wearing options.

Because a basic three-color gradient works with any fiber or color combination, it's the perfect way to transform orphans, singletons and yes, shrine of precious yarns into something pretty and useful. 


The possibilities are endless. To create your own unique gradient or ombre, try pairing turquoise with soft blue for a summery look, turquoise and navy for a sophisticated one, or turquoise and teal for a vibrant one.

If you haven't done so already, take time now to rummage through your stash to see what interesting combinations you discover, then have fun and experiment with this easy but effective gradient strategy.


Connecting with the linkups in the sidebar.

Mar 12, 2017

Going Green

The Pantone Color Institute has declared Greenery (15-0343) the color of the year. It's a lovely, fresh shade that looks a bit like this:

I'm not much of a trend-watcher, but the current focus on green prompted me to wonder why I don't use it more often. The truth, of course, is it appears on a regular basis, but because I tend to favor clear, deep or blue-green shades that better suit my coloring and home decor, it's not always obvious.

That said, once I started hunting for examples, I was amazed at just how often varied shades of green surface in projects. Here's a quick roundup:


ACCESSORIES


These super-simple gradient mitts represent a knitting trifecta: They're fast and easy, designed to use up small balls of leftover yarn, and serve as an example for a new make-your-own ombres and gradients post.


I'm still experimenting, but one way or another the lovely teal and lake yarn below will find a home in a stole, shawl or wrap. In this photo, the colors appear a bit bluer than they are in real life.


AFGHANS


This version of Valere has flashes of mint green and deep teal ...


while this one incorporates shades of jade and mint.


Angletyn Rainbow features a soft shade of teal.


Breidan Baby incorporates a light, minty green.


Color Check Meadow features six shades of green ranging from soft sage to rich teal.


In Drumlin Gemtones, the color appears aqua here, but in reality the strip at the upper right is a rich, saturated teal.


In Drumlin Bright, two shades of green were worked in two-row stripes, which made both colors pop.


In Lucben Tidepool, a mix of purpose-bought yarn was combined with leftovers to create a simple custom gradient.


In this shot of Tikkyn Rainbow, you can see a few of the teal color blocks that stairstep across the front.


HOLIDAY


When I'm making Christmas Trees for the holidays, yarns in shades of pine, balsam and spruce climb out of the cupboards, scamper around the studio, clamber onto the needles, and eventually turn into WIP piles like this:


SWEATERS

In Moore Colors, the mint green stripes peeking out at the right lead into various shades of green, teal and blue that occupy the back.


Last but not least, 20 years ago, I made a lovely teal sweater-jacket in soft, tweedy wool. It's held up beautifully, so I still wear it fall through early spring. Unfortunately, I don't have photos, but I'll try to get some soon.

Meanwhile, daylight savings time has arrived, St. Patrick's Day is a few days away, and snow may be on the ground, but spring 
with its fresh young shoots and leaves is on the horizon. If you're choosing yarn for a new project, try going green. Not only is it right on trend, it's the ideal way to celebrate the bright promise of this lovely season.

Connecting with the linkups in the sidebar.


Mar 8, 2017

7 Reasons Thumbless Mitts are Best

As you well know, I love fingerless mitts and have through the years made so many pairs, I've lost count. You also know that long or short, practical or pretty, all my mitts are thumbless as well.

This must seem incomprehensible to many of you, but there are seven reasons why thumbless mitts work best for me:

1. Less fiddly. Let's face it, working simple thumbless mitts means you can look forward to a quick, fuss-free project, whip up a last-minute gift, or work on something fast and easy when you need a break from larger or more complicated WIPs.

KINTRA BLACKBERRY


2. Adaptable. One of the things I like most is there's no second-guessing, because you can wait until the seaming stage to decide where you want to place the thumb hole and how large to make it.

KINTRA NEARLY NEUTRAL


3. Nearly mindless. Simple and soothing, thumbless mitts are ideal for knitting on the go or decompressing at the end of a demanding day.

WYNDFAEL TURQUOISE


4. Purposeful swatching. Because they're streamlined and compact, thumbless mitts allow you to play with different stitches, yarns, colors and needle sizes, while still creating something useful.

GRADIENT MITTS (WIP)


5. Practical. Wearing mitts while I work and knit keeps my hands and wrists warm and flexible, which reduces aches and pains, but my fingers and thumbs are unencumbered and move freely. If I need my hands free for chores or something similar, it's easy to pop out my thumbs, push the mitts down and tackle the task.

KINTRA PLUM


6. Multiple wearing options. Because they can be worn as mitts, scrunchy gauntlets and folded cuffs, thumbless mitts are extraordinarily versatile, infinitely more wearable and less fussy because you don't have to keep putting them on and taking them off.

GREY DAZE MITTS & SHAWL


7. Short thumbs. Apparently, I have very short thumbs. I learned this when I was a little girl, just starting violin lessons. My teacher, a very talented musician from Czechoslovakia, was always bellowing (literally) that I wasn't holding the instrument properly. One day, he grabbed my hand, examined it intently, and declared my thumbs were too short to play the violin.

KINTRA OYSTER BAY


For what it's worth, I continued to study and play for years, but no, I never became a renowned violinist. Instead, I became a knitter, designer, author and blogger. And I'm okay with that.


Connecting with the linkups in the sidebar.

Mar 5, 2017

How to Create a Simple Custom Gradient

In the Ombres & Gradients: Create Your Own series, we've been exploring ways to make custom gradients using purpose-bought yarn or skeins from stash. Not only are they attractive, fun to create and easy to do, ombres and gradients are an effective way to put orphan skeins and leftover yarns to good use.

To respond to those who asked for more details, I'll be periodically sharing the how-tos in targeted posts like this one. The examples below were featured in the overview, Ombres & Gradients: 5 Ways to Create Your Own, but today we want to delve into specifics for creating a simple, custom three-color gradient.

Let's get started.


1. Simple Custom Gradient: Color Check


One of the easiest ways to create a gradient effect is to choose different shades from the same color family. The biggest challenge is to find the same or compatible yarns in the range of light, medium and dark shades you need.


Color Check features multiple simple gradients, so it illustrates the basic strategy quite well:


Yarn. Cotton Fleece (Brown Sheep)

Stitch. The fast and easy slipped stitch creates an all-over windowpane check. 

Strategy. Each section consists of solid colors worked with black as the unifying main color. To achieve a similar look:
  • Choose one main color and three related colors for each strip.
  • Arrange related colors from dark to light.
  • Work each related color in sequence.

In Color Check Berry, colors were worked in conjunction with MC Cavern as follows (left to right):
  • Strip 1: Blue Paradise, Malibu Blue, Nymph 
  • Strip 2: Raging Purple, Prairie Lupine, Lilac
  • Strip 3: Plum, Berry, Pink-a-Boo
  • Strip 4: Barn Red, Cherry Moon, Tea Rose
This version incorporates 12 purpose-bought colors (plus black), and launched my passion for Cotton Fleece yarn. It also played a pivotal role in plumping up the stash, since each color block only used a portion of the skein. To see another example, look at Color Check Meadow worked in shades of blue, teal, green and yellow.


And Simple Custom Gradient: Lucben Tidepool

Stitch. The easy twisted double seed stitch produces a reversible fabric with identical textures on both sides. 


Strategy. Each section consists of solid blocks worked with cream as the unifying main color. To achieve a similar look:
  • Choose one main color and five related colors.
  • Arrange related colors on the diagonal from light to dark.
  • Work related colors in the sequence described below.

In Lucben Tidepool, colors are separated by MC Cotton Ball and worked as follows:
  • Strip 1: Light Jade, Rue, Mint 
  • Strip 2: Wild Sage, Light Jade, Rue
  • Strip 3: New Age Teal, Wild Sage, Light Jade
This produces a diagonal gradient, which also appears in shades of berry, rose and pink in Lucben Rose. As an added bonus, both Lucben versions were created primarily from stash, using yarn acquired for Color Check.

Hopefully, these examples and how-to instructions will help you see fresh possibilities in both new and stash yarn, and inspire you to experiment with ways to create simple custom gradients of your own.

If this is helpful, let me know, and if you have questions or need clarification, do the same and I'll do my best to respond.


Connecting with the linkups in the sidebar.